Introduction to Lua
Although I heard of Lua several years ago, I decided to study this language recently when Lua entered the top 10 languages of the TIOBE Programming Community Index. To my surprise, Lua is almost an ideal dynamic typed functional language, because it is simple, efficient and powerful. As a learning practice, I wrote a program to draw a graph of any equation or inequation with two variables in Lua. If you are new to Lua, I strongly recommend you read the book Programming in Lua and visit lua.org.
Lua is an extensible extension language. Extensible means libraries can be written in C and accessed in Lua in natural ways. Extension means it can be embedded into a host application so that users can program it. However due to the following two reasons, I want to write a library in C# and call the library in Lua:
- I don't like to program in C/C++
- None of the Lua libraries can match the functionality provided by the .NET Framework
I didn't find an existing solution so I implemented an Lua interpreter by myself. Since the interpreter is written in C#, .NET library can be called in Lua code when it is appropriately wrapped in modules.
Implementation of the Interpreter
The syntax of Lua is defined with parser expression grammar in Lua.Grammar.txt file. Then given the grammar file as input, a homemade parser generator is used to generate the parser code. If the lua code is parsed successfully, a syntax tree with Chunk as root node is returned. Then the interpreter executes the Chunk according to Lua semantics.
Most of the implementation is straightforward, a little difference with standard Lua is that strings are unicode and the library function string.format uses the same formatter syntax as in C#'s string.Format.
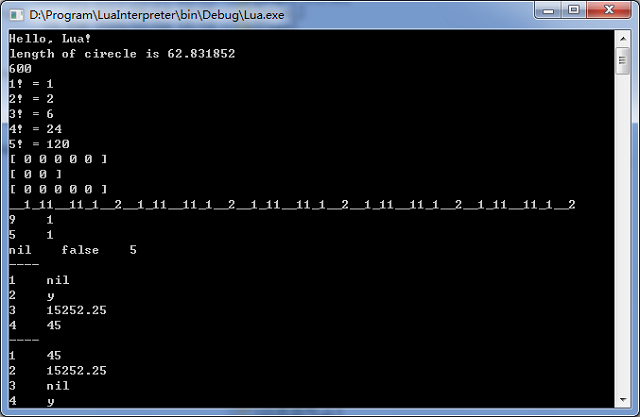
The project code is compiled into two files: lua.exe and wlua.exe, one is command line version and the other is winform version. Here is the result after running the test.lua file:
Windows Forms Library
As a proof of the concept, I write a module to create a UI using Windows Forms. After reading the code in WinFormLib.cs, you will understand why Lua is a miraculous language, the metatable mechanism is more powerful than firstly imagined. The module is named as "Gui", the same .NET type, method, property name can be used to manipulate controls. Here is an example program in WinFormExample.wlua:
 Collapse | Copy Code
form = Gui.Form{
    Text="Main Form", Height=200, StartPosition="CenterScreen",
    Gui.Label{ Text="Hello!", Name="lable", Width=80, Height=17, Top=9, Left=12 },
    Gui.Button{ Text="Click", Width=80, Height=23, Top=30, Left=12,
        Click=function(sender,e) Gui.ShowMessage(lable.Text,"Clicked") end },
}

Gui.Run(form)
Gui.ControlTypeName returns a lua function to create an instance of the control, the function accepts a lua table as its parameter, key value pairs in the table are used to set values to control properties, array items in the table are added as child controls or sub items of the control. One special thing is that when set the Name property, a global variable is created for the control. As you see, Lua as a data descriptive language is more compact than an equivalent XAML file.
The screen shot of this example is:

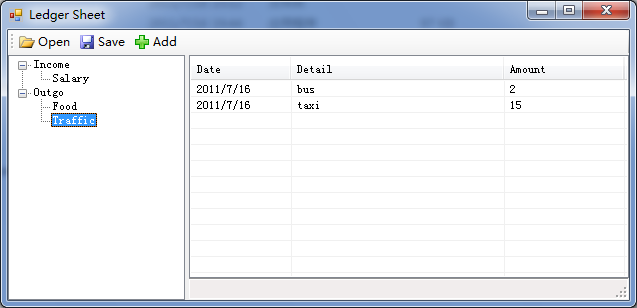
The Ledger.wlua file contains a more complete and practical example, it can add and delete entries to a ledger sheet and save to a file, the saved file can be opened later. Here is the code:
 Collapse | Copy Code
form = Gui.Form{
    Text="Ledger Sheet", Width=700, Height=500, StartPosition="CenterScreen",
    Gui.SplitContainer {
        Dock="Fill", Width=700, SplitterDistance=200,
        Gui.TreeView{ Name="treeviewCategory", Dock="Fill", HideSelection=false },
        Gui.Panel{
            Dock="Fill",
            Gui.ListView{
                Name="listviewEntries", Dock="Fill", View="Details",
			GridLines=true, FullRowSelect=true,
                ContextMenuStrip=Gui.ContextMenuStrip {
                    Gui.ToolStripMenuItem { Text="Delete",
			Click=function(sender,e) DeleteEntry() end }
                }
            },
            Gui.StatusStrip { Name="statusStrip", Dock="Bottom" }
        }
    },
    Gui.ToolStrip{
        Dock="Top", Top=0, Left=0, Width=700, Height=25,
        Gui.ToolStripButton { Name="btnOpen", Text="&Open",
				Width=88, Height=22, Image="icon\\open.png" },
        Gui.ToolStripButton { Name="btnSave", Text="&Save",
				Width=88, Height=22, Image="icon\\save.png" },
        Gui.ToolStripButton { Name="btnAdd", Text="&Add",
				Width=88, Height=22, Image="icon\\add.png" },
    }
}

incomeNode = treeviewCategory.Nodes.Add("Income")
outgoNode = treeviewCategory.Nodes.Add("Outgo")
listviewEntries.Columns.Add(Gui.ColumnHeader{ Text="Date", Width=100 })
listviewEntries.Columns.Add(Gui.ColumnHeader{ Text="Detail", Width=260 })
listviewEntries.Columns.Add(Gui.ColumnHeader{ Text="Amount", Width=120 })

dialog = Gui.Form{
    Text="Add Entry", Width=320, Height=220, StartPosition="CenterParent",
		FormBorderStyle="FixedDialog", ShowInTaskbar = false;
    Gui.Label{ Text="Subject:", Width=60, Height=17, Top=14, Left=12 },
    Gui.RadioButton { Name="dialog_Income", Text="Income",
				Width=80, Height=20, Top=9, Left=80 },
    Gui.RadioButton { Name="dialog_Outgo", Text="Outgo",
				Width=80, Height=20, Top=9, Left=160, Checked=true },
    Gui.Label{ Text="Category:", Width=60, Height=17, Top=40, Left=12 },
    Gui.ComboBox { Name="dialog_Category", Width=160, Height=20, Top=36, Left=80 },
    Gui.Label{ Text="Detail:", Width=60, Height=17, Top=68, Left=12 },
    Gui.TextBox { Name="dialog_Detail", Width=160, Height=20, Top=64, Left=80 },
    Gui.Label{ Text="Amount:", Width=60, Height=17, Top=96, Left=12 },
    Gui.TextBox { Name="dialog_Amount", Width=128, Height=20, Top=92, Left=80 },
    Gui.Label{ Text="Date:", Width=60, Height=17, Top=128, Left=12 },
    Gui.DateTimePicker { Name="dialog_Date", Width=128,
				Height=21, Top=124, Left=80, Format="Short" },
    Gui.Button{ Text="OK", Name="dialog_btnOK", Width=80,
				Height=23, Top=156, Left=130, DialogResult="OK" },
    Gui.Button{ Text="Cancel", Name="dialog_btnCancel", Width=80,
				Height=23, Top=156, Left=224, DialogResult="Cancel" },
    AcceptButton=dialog_btnOK,
    CancelButton=dialog_btnCancel
}

Entries = {}

btnAdd.Click = function (sender,e)
    dialog_Detail.Text = ""
    dialog_Amount.Text = ""
    if treeviewCategory.SelectedNode ~= nil and
			treeviewCategory.SelectedNode.Tag ~= nil then
        dialog_Category.Text = treeviewCategory.SelectedNode.Text
    end
    if dialog.ShowDialog(form) == "OK" then
        local subject = dialog_Income.Checked and "income" or "outgo"
        local category = dialog_Category.Text
        local detail = dialog_Detail.Text
        local amount = dialog_Amount.Text
        local date = dialog_Date.Value.ToShortDateString()
        local entry = {date, subject, category, detail, amount}
        table.insert(Entries, entry)
        local categoryNode = UpdateCategoryTree(entry)
        if treeviewCategory.SelectedNode == categoryNode then
            AddEntryToListView(entry)
        else
            treeviewCategory.SelectedNode = categoryNode
        end
    end
end

function FindCategoryNode(entry)
    local subject = entry[2]
    local category = entry[3]
    local subjectNode = subject == "outgo" and outgoNode or incomeNode
    local subNodes = subjectNode.Nodes.Find(category, false)
    if #subNodes == 0 then
        return nil, subjectNode
    else
        return subNodes[1], subjectNode
    end
end

function UpdateCategoryTree(entry)
    local categoryNode, subjectNode = FindCategoryNode(entry)
    if categoryNode == nil then
        local category = entry[3]
        categoryNode = subjectNode.Nodes.Add(category, category)
        categoryNode.Tag = {}
        dialog_Category.Items.Add(category)
    end
    table.insert(categoryNode.Tag, entry)
    return categoryNode
end

treeviewCategory.AfterSelect = function (sender, e)
    local entries = treeviewCategory.SelectedNode.Tag
    if entries ~= nil then
        listviewEntries.Items.Clear()
        for _,entry in ipairs(entries) do
            AddEntryToListView(entry)
        end
    end
end

function AddEntryToListView(entry)
    local item = Gui.ListViewItem{ Text=entry[1] }
    item.SubItems.Add(entry[4])
    item.SubItems.Add(entry[5])
    item.Tag = entry
    listviewEntries.Items.Add(item)
end

function DeleteEntry()
    local item = listviewEntries.SelectedItems[1]
    local entry = item.Tag
    if entry ~= nil then
        local categoryNode = FindCategoryNode(entry)
        table.removeitem(categoryNode.Tag, entry)
        table.removeitem(Entries, entry)
        listviewEntries.Items.Remove(item)
    end
end

btnSave.Click = function (sender, e)
    local sfd = Gui.SaveFileDialog{ Title="Save data", Filter="data file(*.dat)|*.dat" }
    if sfd.ShowDialog() == "OK" then
        local file = io.open(sfd.FileName, "w")
        file:write("Entries = {\r\n")
        for _,entry in ipairs(Entries) do
            file:write('{"', table.concat(entry, '", "'), '"},\r\n')
        end
        file:write('}')
        file:close()
    end
end

btnOpen.Click = function (sender, e)
    local ofd = Gui.OpenFileDialog{ Title="Open data file",
			Filter="data file(*.dat)|*.dat" }
    if ofd.ShowDialog() == "OK" then
        dofile(ofd.FileName)
        incomeNode.Nodes.Clear()
        outgoNode.Nodes.Clear()
        dialog_Category.Items.Clear()
        for _,entry in ipairs(Entries) do
            UpdateCategoryTree(entry)
        end
        treeviewCategory.ExpandAll()
        listviewEntries.Items.Clear()
    end
end

Gui.Run(form)
The Ledger Sheet form:
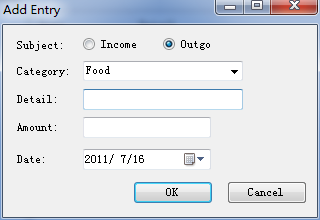
The Add Entry dialog:
Tips to Run Lua Code File
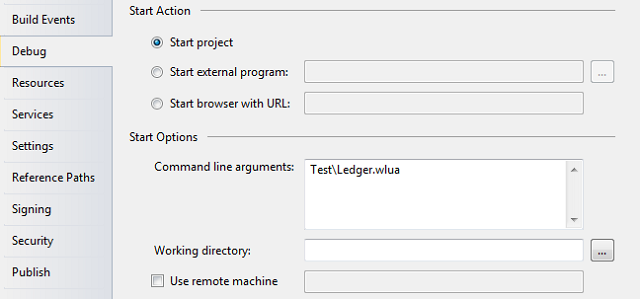
The first method is in Visual Studio project properties, set file name as command line parameter in Debug tab page.
In this way, the lua code can be debugged indirectly through the execution of interpreter.
The second method is in Windows file explorer, drag .lua file to lua.exe, it will start lua.exe and pass .lua file as a parameter, the same works for .wlua file and wlua.exe.
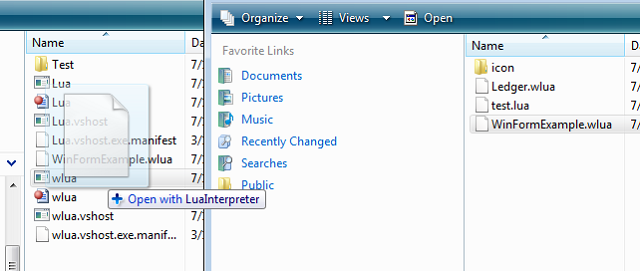
The third method is when you ship the software, compiling the interpreter will lua code file path hard coded.
Matters Need Attention
The possible usage of this project is use Lua as a data description language or a script language for a .NET application. Currently the code is just enough for a demo, many features are incomplete and untested, you may need to do it by yourself if you want to include the Lua interpreter in a large project.
History
- 2011-07-19 Initial release
- 2012-09-22 Fix bug in parse "i == -1"
- 2012-09-23 Fix bug in parse "t={f=function() end}"

